FAQs
- Q. Wings add drag, so won’t I go slower?
- Q. How do i convert drag into BHP absorbed?
- Q. How wide should my wing be?
- Q. How high up and how far back should my rear wing be?
- Q. Where should i position my front wing?
- Q. Is a wing with spanwise twist better than a plain, straight wing?
- Q. But what does this particular spanwise twist do?
- Q. How can I tell what the maximum angle of my wing should be?
- Q. Is a large chord single element wing better than a dual element wing with the same chord dimension?
- Q. How do i calculate data for wing profiles cut to different widths (spans)?
- Q. What effects will fitting a Gurney Flaps have on wing performance?
- Q. How should I go about setting up & tuning my wing?
- Q. Difference in efficiency top swan verses lower mounts Lemans rule changes article
Q.Wings Add drag, so wont i go slower?
A. In the context of motorsport and track driving, the short answer is almost certainly not! Wings add considerably more downforce than drag, and downforce generates extra grip. Providing that grip is well balanced front and rear throughout the speed range, most drivers will have no problem exploiting the extra grip and lapping or running faster over a given course. The extra grip helps not only to maintain higher cornering speeds, but it also helps with braking, acceleration and confidence too. Indeed it is often the case that end of straight speeds increase once a car generates more downforce by using wings, despite the generally small amount of extra drag they do also create, because speed through the previous corner will be higher, and acceleration out of it will possibly be better too.
When it comes to improving lap or run time, maximum speed is not usually very significant, whereas grip is crucial. There are exceptions where high speed is maintained for a sufficient length of time to be significant of course. But this is why we like to advise you personally on the best wing configuration for your car, so we can take into account how much power you have, what venues you compete or drive at, and also advise you on ways to aerodynamically balance your car so you can maximise the benefit of your new wing!
Q. How do I convert drag into bhp absorbed?
A. Use this formula to convert drag into absorbed bhp : (2 x drag(N) x speed ( m/s )) ÷ 1500
A. The wider a wing is, the more efficient it is, so the simple answer is to run as wide a wing as your technical regulations allow. If there are no applicable regulations on maximum ‘span’ for your application then the rule of thumb is to run it the same width as the maximum width of your car. At least that way when you walk to the back of the car you won’t run head on into the wing, though you might catch your shoulder on it!
This answer takes on a more serious technical tone though when discussing applications on closed saloons/sedans and GT cars especially, although this also applies to any type of car really including sports racing and single seater racing cars. Essentially the airflow to the centre section of any wing is the part most adversely affected by the car ahead of it, and the outer sections generally see the ‘cleanest’, most energetic air. Even with a relatively ‘sleek’ GT car the air that encounters the centre part of the wing loses energy during its passage over the car. So it is often the outer sections of a wing that generate the most downforce, and generally speaking because of this a wider wing just adds efficient benefit.
Q.How high up and how far back should my rear wing be?
A. Sometimes technical regulations limit the maximum height and the furthest back a wing may be, but this can still leave room for manoeuvre. Sometimes there are no technical regulations in this respect, in which case the options are infinite. So let’s try and put some more rules of thumb in place where we can, and examine the implications of more open options where we can’t.
In the case of closed saloons/sedans and GT cars that apply maximum height and maximum rearward positions (often related to maximum roof height and the rearmost extent of the vehicle), generally speaking put the wing as high and as far back as you can. This will enable it to work as well as it can by putting it in the ‘cleanest’ air available.
With sports racing and single seater racing categories, usually wing position is defined in technical regulations too, and as high and far back as allowed often works best, and it certainly works well. However, there are instances where a lower and possibly more forward position can interact with a rear diffuser exit and help to generate more efficient downforce from the underbody even though wing downforce might decrease in such a modified location. This is something that can only really be quantified with some form of instrumented testing on track or in a wind tunnel, although a good test driver can help determine the best solution here too. Some single seaters (and some sports racers) run a lower wing tier and an upper wing tier to gain benefit all round in this regard, though this configuration is generally for more potent racecars that are less sensitive to the additional drag that inevitably accrues.
Where there are no positional limits, it should be borne in mind that any wing that is behind the rear axle (and the reverse applies to front wings ahead of the front axle) exerts leverage and as such adds more force to the rear wheel contact patches than the wing itself generates. It also exerts leverage that reduces the forces felt at the front wheel contact patches too, and the greater the wing overhang the greater these effects will be. The car’s aerodynamic balance will also be more sensitive to wing angle changes too, since these will have greater effect with greater ‘mechanical overhangs’. A helpful rule of thumb to begin with though is to aim for similar overhangs front and rear, measured to the lowest point on the wing (or front splitter’s) underside, which is roughly where the respective centres of pressure are. At least if the mechanical effects start off similar, it’ll be easier to find an aerodynamic balance. And fine-tuning on track to achieve a balance will always be required once you’ve fitted your wings.
With closed saloons/sedans and GT cars with no limit to the rearward location of the wing, it can be of benefit to mount the wing further rearwards so that it’s leading edge is between just overlapping the rearmost part of the car’s boot/trunk by a few centimetres to about roughly in line with it. Two benefits can accrue here; first, the low pressure region that develops below the wing is moved behind the rear ‘deck’ area, which means it all goes towards sucking the wing downwards instead of also sucking the rear deck upwards; and second, that same low pressure region may interact with any rear diffuser that may exist now or in a future development.
In terms of how high to put a wing where there is no limit, keep in mind here that the higher a wing is, although it may be in cleaner air and thus perform more as if it was in ‘freestream’ air, the greater will be the leverage from the drag component too, which will also tend to take more weight off the front tyre contact patches as speed builds. The more ‘powerful’ the wing is, the greater this effect will be.
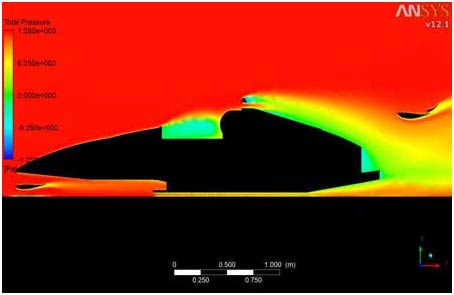
But there isn’t really any need to go much over the maximum height of any vehicle to get a wing to work well. The image below shows ‘total pressure’, which is a measure of the total energy of the airstream, along the centreline of a single seater model tested in CFD, and you can see where energy losses occurred compared to the full energy (red) regions. The rear wing seemed to be getting almost a full energy feed at its regulation height (900mm here), and it wouldn’t appear to need raising very much to get it into full energy air, if that were permitted. And as mentioned above, with any vehicle there might even be a lower height at which a stronger interaction with the underbody occurred that could yield a net gain in downforce.
Q.Where should i position my front wing?
A. If you look at the front wing in ground effect data you will see that there is a sharp rise in downforce from ground effect when the wing gets below 100mm to the ground. To keep the car stable & predictable over bumps or under heavy braking, it is advisable to mount the wing 100mm or higher so its operating in a more linear & predictable region.

Q.Is a wing with spanwise twist better than a plain, straight wing?
A. In short, unless the width and amount of the spanwise twist has been optimised for your car and for a specific wing location on your car in respect of its height and fore and aft location, then it is very hard to know whether it is actually right for you car, and you are probably better advised to choose a plain, untwisted wing. Let’s look at why wings incorporate spanwise twist to try and explain that assertion.
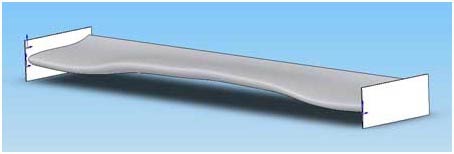
First, there are many forms that spanwise twist can take, but the common form that will be discussed here has the centre section of the wing at reduced angle, relative to the horizontal, compared to the outer sections (see below). The width and angular difference of the ‘raised’ centre section can be more or less than shown in this generic CAD drawing.
Q.But what does this particular spanwise twist do?
A.It’s a shape that is often seen on the back of saloons/sedans and GT cars and simply put, by reducing the angle of the centre section it aims to align the wing profile with the angle of the airflow actually approaching it across the span. The airflow coming down a rear screen is not at the same angle as the airflow that encounters the outer sections of the wing, which if the wing is as wide as the car, is virtually horizontal. If you like, it attempts to achieve the same effective angle of attack relative to the airflow across the whole wingspan. Without this particular twist, a plain wing that is set at a moderate angle relative to the horizontal will effectively be at a steeper angle in the centre, and as the wing’s angle is increased above a moderate angle the flow under the wing may actually start to separate and ultimately stall in the centre as the effective angle becomes too steep. The twist form we see here was one of the earliest methods devised of enabling a single element wing to be pushed to steeper angles on GT cars without causing flow separation or stall in the centre section.
However, what this also does is to reduce the wing’s downforce potential at more moderate angles. How so? Well, the centre section of the wing on a closed car already generates less downforce than the outer sections because the air that encounters the centre part of the wing has had to do some ‘work’ in passing over the car’s upper surface, and it loses energy during this passage. The wing cannot therefore develop the same magnitude of low pressure on its central underside, or indeed magnitude of raised pressure on its central upper surface, as the relatively undisturbed air that encounters the wing’s outer sections. See the figure below, which shows the lower surface of a half wing with no twist tested in CFD in freestream (top) and on a GT car (bottom), where the wing end plate is on the right in both cases.
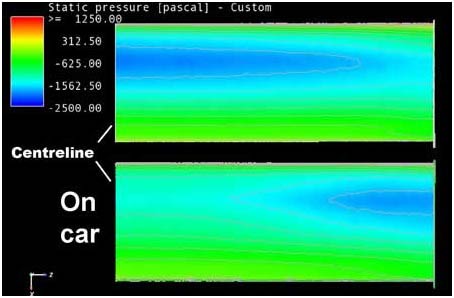
Notice that the region of lowest pressure (blue) in freestream (that is, not on a car but in isolation) is in the centre of the wing, whereas when the wing is on the car the central low-pressure region is much reduced in magnitude (less blue in the centre). This is essentially why wings generate less downforce on a car than they do in isolation, and the extent to which the wing’s performance is affected depends on the extent to which the car affects the airflow that reaches the wing. But even a sleek GT shape will create this effect – a GT car was used in the above trial .
So if you then reduce the effective angle of attack of the wing’s centre section by incorporating the type of twist we are discussing here, you further reduce its ability to generate downforce by ‘weakening’ the wing in the region where its downforce potential has already been weakened by the car ahead of it.
As was stated above though, a wing incorporating this twist can be set at steeper angles before it starts to stall anywhere across its span, and this is certainly why this form was originally developed, But it is also true that if you need to run a single element wing at or near its peak angle then you might be wise to consider running a dual element wing at a low to medium angle instead, which will allow you to develop greater downforce than a single element’s peak downforce level for less drag, or significantly less drag at the single element wing’s peak downforce level. You will also be able to generate much greater peak downforce should it be required.
The twisted wing form here was most likely first developed on GT cars where the regulations did not permit dual element wings, and so it was necessary to maximise the downforce potential of the single element wings that were permitted. However, it is interesting to note that other very different forms of twist were later adopted as more and more efficient plan forms and profile forms were developed for particular applications.
Meanwhile, our advice is first and foremost to check that the wing you are thinking of buying has a profile developed specifically for motorsport, as ours have. And to keep things simple, go for a straight untwisted wing that you can optimise the location and angle of on your particular car through testing and evaluation using ‘flow visualisation fluid’ (see below).
Q.How can I tell what the maximum angle of my wing should be?
A. Our data charts and graphs give an idea of the overall performance and the maximum angle that your wing could go to if it were mounted in ‘freestream air’, that is, in isolation. We do this because it is useful to compare the relative performance of our wings with the others in our range. But clearly the performance of any wing reduces once it is mounted on a car, and this is especially true of rear wings because the car has an effect on the airflow that ultimately reaches the wing. And the extent to which the airflow is affected depends on the type of car in question and also on the wing’s span, and its height and rearward position relative to the car. So it’s impossible to generalise on what the maximum or optimum angle might be on a given car, although if you contact us to discuss this we will be happy to advise for your particular application.
However, once you have your wing installed, the question still remains, but there are ways in which you can determine how steep you can set your wing. This is something touched on in the response to the question above, and is probably more applicable to closed saloons/sedans and GT cars where the flow down the rear screen can change the angle of the airflow that encounters the centre section of the wing, depending on the car’s shape and the wing’s position above the car.
Ignoring for a moment that you may not want or need to run your wing as steep as possible, here is a method of determining for yourself what the maximum angle of your wing should be. Start this experiment with the wing set to the steepest angle available. Now mix up a small volume of paraffin or diesel fuel (say 25ml) with a few spots of copper grease (to colour the oil). Prepare to run the car, and just before setting off, apply drops of this liquid across the wing along the leading edge. Then accelerate the car quickly up to an appropriate test speed and hold it for 10 to 15 seconds to allow the fluid to streak out along the wing’s underside. Stop, examine and photograph the patterns on the underside. Ideally you will see streak marks all the way back to the trailing edge. But you may not, because parts of the wing may be showing ‘flow separation’. This will be visible where the streak marks stop trailing backwards and instead go sideways. The amount of wing thus affected will hopefully be quite small, but if a significant area is showing flow separation, clean the wing, reduce its angle by one increment and re-run the test. Repeat until at least 90% of the wing is showing good flow attachment, that is, streak marks reach the trailing edge over most of the wing. This can now be taken as the effective maximum angle at which to run your wing. You can also re-run this test at lower speeds to determine the slowest speed at which you see adequately attached flow, which if you like is the speed at which the wing starts to ‘work’.
In the case of closed cars with low mounted wings, because the centre section of the wing may be prone to flow separation before the outer sections, it will be tempting to reduce the wing’s angle until the centre section shows full flow attachment, as described above. But in reality, because the outer sections of a full width wing on a closed car generate most of the downforce, aiming for full attachment across the whole span would miss out on a lot of available downforce. In such a case the wing can be run steep enough that the centre section may show significant flow separation, but as long as the outer sections show no signs of flow separation, additional downforce may still accrue.
Unfortunately the only way to be sure of the maximum wing angle in such a case is to carry out some form of instrumented testing on track or in a wind tunnel to measure downforce and drag over the range of available wing angles. But it is possible to make an educated guess for wings mounted within the region bounded by the maximum roof height and the rear of the car (as they often are because of technical regulations). Let’s look at an example. The graphic below from a CFD simulation shows a close up of the rear end of a GT car with a rear spoiler and a rear wing sitting above the spoiler. Velocity vectors are plotted on the centreline here.
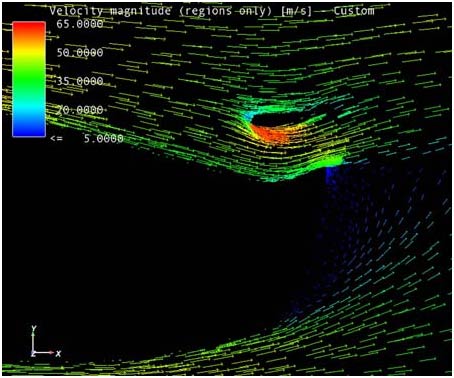
The wing is set at +8 degrees here, but it can be seen that the flow vectors are approaching the wing at a downward angle along this centreline slice of roughly 8 degrees with the wing in the location shown. Thus the wing’s effective angle in the centre is more like 16 degrees. And although it can barely be seen in this view, the wing is actually just beginning to show signs of flow separation along its rearmost third at this point across its span. So in all likelihood, if the wing is only just beginning to ‘give up’ in the centre, it would be possible to run it somewhat steeper still, perhaps by another 2 to 4 degrees or so, before downforce gains tailed off and drag started to climb further. So in this instance the maximum angle might be estimated to be in the 10 to 14 degree range. Interestingly, the CFD did show the downforce gains tailing off above 12 degrees, and drag began to climb more steeply. But it’s easy to see that a lot depends on the car’s shape and the exact wing location.
Back to FAQs.
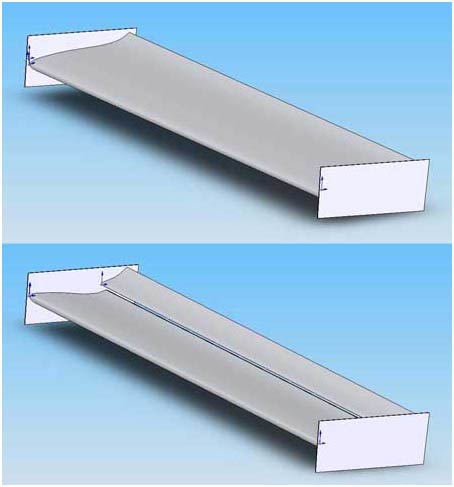
A. It depends exactly what you are comparing, but in CFD trials done with a reveries high downforce 300mm wing profile, there was very little in it. The comparisons were done with the 300mm chord combined with a 110mm flap set at 20 degrees to the main element, versus a hypothetical 400mm chord version of the 300mm main element. Spans were set to 2000mm. The CAD models are shown in the figure below, and the results are shown in the plots below that.
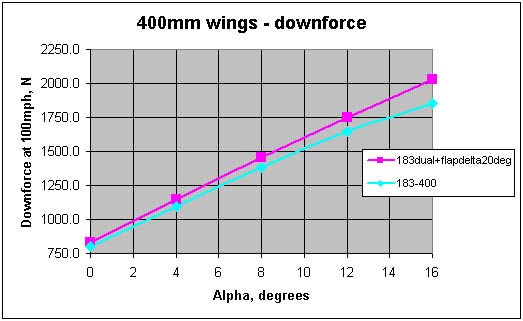
(Divide Newtons by 9.81 to get kg, and multiply kg by 2.2 to get pounds).
So looking at the 'alpha' (angle of attack) versus downforce plot, we can see that the dual element wing generated slightly more downforce than the single element wing with similar chord dimension at each of the angles tested. Furthermore, the single element wing’s performance had started to decline at the upper end of the angle range, suggesting the wing was nearing its peak angle, whereas the dual element wing’s plot line was still fairly linear, suggesting its peak was at a higher angle yet, which could yield potentially greater peak downforce when required.
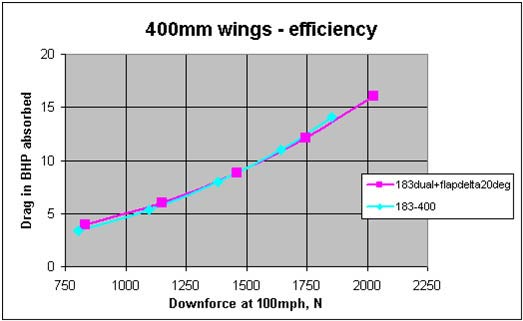
In terms of efficiency, which is to say, downforce versus drag (in BHP absorbed here), there was very little to choose between the wings across much of the range tested. The fact that the curves are virtually coincident tells us that they generated very similar levels of drag at the same level of downforce. At the lowest angle tested the hypothetical single element wing only absorbed 0.63bhp less at 100mph than the dual element wing. In the middle of the range the two curves were essentially coincident, so drag was the same at these downforce levels. And then the hypothetical 400mm single element wing started to generate slightly more drag as it neared the steepest angle tested here, so the dual element wing was more efficient at higher angles and downforce levels.
So if you need a 400mm chord wing and your technical regulations allow you to use more than one element, look no further than the 300mm and 110mm dual element wing that can be run across a wide range of angles to match a wide range of applications and downforce requirements. It’s generally preferable to use the widest wings possible (allowable in the regulations) as this leads to the greatest efficiency, but ensure you can get a front/rear aero balance! Additionally, wider wings will often be more efficient & generate better downforce because they are also not "masked" by body work, as often the outer tips can operate in ‘cleaner’ air. See ‘Q. How wide should my wing be?’ above.
Q. How do I calculate data for wing profiles cut to different widths (spans)?
A. The data here were generated at 1700mm span. So substitute your required span width as MYSPAN in this equation.
Df or drag at MYSPAN = MYSPAN/1700 x Df or Drag at 1700mm width.
This equation will give a good approximation of Df and Drag at other span widths.
Q. What effects will fitting a Gurney Flaps have on wing performance?
A. As a generalisation wings seem to be more efficient at low angles without Gurneys but can become more efficient at steeper angles with a Gurney. The cross over is probably somewhere mid to upper range, 8-10deg, but will likely depend on the wing profile and how it is deployed. The Gurney flap delays flow separation and stall at higher AoAs and therefore you can generate more down force if you need. If you need to run the wing at a steep angle to get the down force you need but you need also to reduce drag slightly then you might try adding a small Gurney and reducing AoA by 1 or 2 deg
Q. How should I go about setting up & tuning my wing?
A. Best bet as always is go and track test the car, tune the wing to get a nice aero balance in the higher speed turns (ideal is aero balance close to Centre Of Gravity), if you can’t get enough rear grip then add a gurney and increase the AOA If you are looking for a drag reduction but you need to maintain a high AoA to get enough down force then try fitting a small Gurney and reducing the wing angle by 1 or 2deg.’ Difficult one to prove out any savings in drag using a data logger looking at top speed to measure this small change, probably need a pitot tube and expensive data loggers to really see any gains.
Ignoring for a moment that you may not want or need to run your wing as steep as possible, here is a method of determining for yourself what the maximum angle of your wing should be. Start this experiment with the wing set to the steepest angle available. Now mix up a small volume of paraffin or diesel fuel (say 25ml) with a few spots of copper grease “copper slip” (to colour the oil). Prepare to run the car, and just before setting off, apply drops of this liquid across the wing along the leading edge. Then accelerate the car quickly up to an appropriate test speed and hold it for 10 to 15 seconds to allow the fluid to streak out along the wing’s underside. Stop, examine and photograph the patterns on the underside. Ideally you will see streak marks all the way back to the trailing edge. But you may not, because parts of the wing may be showing ‘flow separation’. This will be visible where the streak marks stop trailing backwards and instead go sideways. The amount of wing thus affected will hopefully be quite small, but if a significant area is showing flow separation, clean the wing, reduce its angle by one increment and re-run the test. Repeat until at least 90% of the wing is showing good flow attachment, that is, streak marks reach the trailing edge over most of the wing. This can now be taken as the effective maximum angle at which to run your wing. You can also re-run this test at lower speeds to determine the slowest speed at which you see adequately attached flow, which if you like is the speed at which the wing starts to ‘work’.
Q. Difference in efficiency top swan verses lower mounts Lemans rule changes article
Mounting the wing from above with “swan necks” rather than below has come about via rule changes in LMP racing reducing the allowable wing width from 2m to 1.6m.
In a search for trying to get back some of the lost downforce via this span reduction narrow top mounted “Swan” profiles have been used as they do not present as much of a disturbance to the air passing over them and under the wing (as shown in second screen shot from the CFD in the article) therefore allowing the underside of the wing to work better. The exact benefits have yet to be CFD compared or tested back to back in the public domain, certainly the trend is now widely used in many racing applications. More information.
Wing FAQ’s thanks to Simon McBeath, The Wing Shop


